|
New
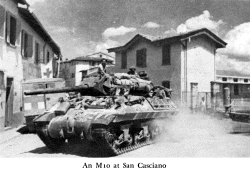
Zealand M10 tank destroyer at San Casciano
New Zealand forces take San Casciano 26 July 1944
Because 6 South African Armoured Division had been unable to keep pace on 5 Brigade's other (eastern) flank, it was necessary for the New Zealand Division to clear Route 2 and make a frontal assault on San Casciano while 6 Brigade exploited 5 Brigade's success and crossed the Pesa to make a left hook round the north-west of the town. The enemy was expected to resist stubbornly at San Casciano, which was a centre of communications on commanding ground.
Armcav, driving up Route 2, had been held up on 26 July at the Terzona stream. Early next morning an armoured car patrol managed to cross farther upstream and reach a road junction near
Mercatale, but was halted by mines on the Mercatale – San Casciano road. The main body of Armcav also crossed the Terzona and advanced along Route 2. The tanks and other vehicles were delayed
by demolitions, but shortly before 10 a.m. infantry of 22 Battalion entered San Casciano unopposed except by some sniper fire.
The town, at the junction of several roads, had been abundantly mined and booby-trapped, and the roads badly blocked by a
combination of British bombing and shelling and German demolitions. When one of 22 Battalion's carriers following the infantry struck a mine, two men were killed and three wounded. A house-to-house search by infantry and tanks cleared the town of snipers. The engineer detachment from 6 Field Company, with a bulldozer, worked hard to make the road passable up to and through the town, but this work became extremely hazardous about midday, when the enemy laid shell and mortar fire on the roads and their junction in the town. Much of this fire came from the east.
On the occupation of San Casciano, Armcav passed from 5 Brigade's command to 4 Armoured Brigade, which was to take over this sector and continue the advance. When tanks of 20 Armoured Regiment and the rest of 22 Battalion reached San
Casciano, Armcav was disbanded.
Fourth Brigade sent out strong patrols, including armoured cars or tanks (or both), to reconnoitre the roads radiating from San
Casciano. They found that movement north of the town was hindered by shelling and numerous demolitions and mines. B Squadron of 20 Regiment and 3 Company, 22 Battalion, attempted to go along the road leading north-westward through Talente to
Cerbaia, but were halted by a bad demolition about a mile from San
Casciano. One of B Squadron's tanks was set alight by shellfire, another damaged on a mine, and a third halted by mechanical trouble.
Florence, about 10 miles to the north, was visible from a tower in San
Casciano.
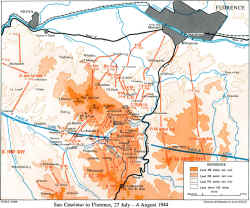
Map showing the subsequent advance on Florence
Sixth Brigade had received orders on 26 July to pass through 5 Brigade with the task of forming a bridgehead over the Pesa between San Casciano and Cerbaia and continuing the advance. After 5 Brigade had occupied La Ripa, 26 Battalion (Lieutenant- Colonel Fountaine) was to advance to the Pesa and establish a bridgehead as close to Cerbaia as 5 Brigade's advance would allow. After crossing the Pesa this battalion was to attack objectives on the high ground to the north. It was to have under command C Squadron (less a troop) of 19 Armoured Regiment, a platoon of machine guns, a troop of six-pounder anti-tank guns, a section of 17-pounders, and a detachment of engineers. The 24th Battalion (Lieutenant-Colonel Hutchens), with a similar supporting force,
was to follow hard on the heels of the 26th into the bridgehead and was to attack on its left. The 25th Battalion (Lieutenant- Colonel Norman), in reserve, was to form a firm base in the bridgehead.
The three battalions had been brought up to positions along the road south of San Pancrazio. A Company of 26 Battalion took over La Ripa from 21 Battalion at 3 a.m. on the 27th.
At the start of 26 Battalion's advance the artillery, which had been firing on targets ahead of 21 Battalion, turned its attention to previously selected targets in the area of the proposed bridge- head and eastwards from Cerbaia to La Romola. The tanks and other supporting vehicles were unable to get past a mined demolition on the edge of La Ripa until a way had been cleared by the sappers of 8 Field Company. As dawn began to break the infantry and tanks came under shell and mortar fire from across the Pesa. The infantry reached the bank of the river about 7 a.m. and soon discovered that a heavy explosion heard earlier had been the demolition of the bridge.
No enemy was found on the western side of the river, so the tanks were called forward to assist the infantry to cross and attack Cerbaia, from which machine-gun fire was being directed at the men on the bank. A small bridge over a stream collapsed under the weight of the leading tank, which rolled over into the stream, but a bulldozer made a crossing for the other tanks, which engaged in a duel with enemy guns on the high ground behind Cerbaia.
A patrol investigated the demolished bridge, which had so dammed the Pesa that the fording of it appeared feasible. A
Company's commander (Major McKinlay) decided about 8 a.m. to attack across the river. C Squadron's leading tanks tried to cross where the slope of the bank offered a route, but two ran on to mines, and the others temporarily withdrew to cover while the sappers bulldozed a track in an unmined area. Meanwhile the infantry crossed and found that the enemy had gone from Cerbaia.
The remainder of 26 Battalion came forward on the western side of the Pesa, as also did 24 Battalion, which was intended to move across the rear of the 26th to a base at the nearby village of Castellare, also vacated by the enemy; there the 24th was to take over the left-hand sector of a two-battalion attack by 6 Brigade against the Pian dei Cerri hills. The tanks of B Squadron, 19 Armoured Regiment, under 24 Battalion's command, crossed the Pesa at a shallow place discovered east of La Ripa and advanced to Talente, where they engaged enemy gun positions, but
apparently did not make contact with the 4 Brigade patrol attempting to reach Talente from San Casciano.
The New Zealand Division had been able to occupy San Casciano and Cerbaia without opposition and reach its final objectives west of the Pesa on 27 July because 1 Parachute Corps had withdrawn the previous night, as planned, to the Paula Line. The Division now was about to embark upon the final and hardest-fought stage of its advance to
Florence.
The Paula Line, the last of the enemy's planned delaying positions south of Florence, followed an eastward course from
Montelupo, at the confluence of the Arno and Pesa rivers, across Route 2 towards the Arno valley between Florence and
Arezzo. When 1 Parachute Corps withdrew to the Paula Line on the night of 26–27 July, the adjacent left wing of 14 Panzer Corps went back to the same line, and the point of contact between the two corps was moved eastward (to about two miles west of
Cerbaia) to give 1 Parachute Corps a smaller sector, which enabled the enemy to thicken the concentration of
armour, artillery and infantry
opposing the two divisions - the New Zealand and South African - most closely approaching Florence.
As a result of this contraction of 1 Parachute Corps' front the New Zealand Division, which had been opposed from the start of the advance by 4 Parachute Division, now faced its western
neighbour, 29 Panzer Grenadier Division, whose sector included the high ground of the Pian dei
Cerri. From the crest of these rolling wooded hills, rising in places over 1000 feet, both the
Pesa valley to the south and the
Arno valley and Florence to the north could be dominated by fire.
The New Zealand Division's front had widened sufficiently to permit a two-brigade attack against this high ground. General Freyberg was confident early on 27 July that an advance over the Pian dei Cerri would drive the enemy back and clear the way to Florence. He discussed plans for the opening of a New Zealand club in the city. By the evening, however, it was obvious that the Division had run up against more determined opposition than it had yet encountered in the campaign, and that something more in the nature of a set-piece attack would have to take the place of the probing advances by single companies which had succeeded up to this stage. The plan for that night, states the GOC's diary, was ‘modified and qualified and modified again in the usual
manner.’ Finally it was decided that 4 and 6 Brigades should make independent attacks with limited objectives.
On the left of the New Zealand sector 8 Indian Division had entered Montespertoli
unopposed on the morning of 27 July and, before the day ended, had drawn level with 5 NZ Brigade, whose role of protecting the New Zealand Division's left flank
therefore was no longer necessary. On the right of the New Zealand sector 6 South African Armoured Division had found
Mercatale, south-east of San Casciano, vacated by the enemy, but had been able to advance only a short distance beyond the village against stiffening resistance and under fire from guns on the high ground around
Impruneta, and also had come up against strong enemy positions on Poggio Mandorli, south of
Strada. Thus, until such time as the South Africans should draw level, 4 NZ Armoured Brigade, which was proposing to push north from San Casciano, had an unprotected right flank and was exposed to counter-attack and to fire from the guns around
Impruneta.
|

)
)